How to enable/disable the default Administrator account in Microsoft Windows Vista, Windows 7 & 8 using Command Prompt


What is the default Windows Administrator account in Windows?
When a Windows Operating System is freshly installed in any computer, you will be asked to enter a user name and password. This user that you create is not the default Windows Administrative account although it has administrative privileges. When entering a username, the system will not permit you to enter system reserved names such as “Guest” and “Administrator”. You may however enter alternative usernames such as “Admin” or “YourName”.
It is this reserved name “Administrator” that is being referred to as the default Windows Administrator account. This powerful account is always disabled by default in Windows Vista, Windows 7 and Windows 8. In Windows XP, it is enabled by default but hidden.
Windows Administrator account disabled by default
In Windows Vista, Windows 7 and Windows 8, the Windows Administrator account is disabled by default. Being disabled also means that this account is invisible and cannot be used to log on unless it is activated. This is done to increase security because this account does not have a password by default. Added security maybe a good news for the average computer user but this will be a pain in the ass for the technician.

How to enable the default Windows Administrator account using the Command Line
Having discussed the reasons behind the disabled Administrator account, there are times when this all-powerful account will be needed. It comes in handy when you are trying to recover a system or when you want to reset the user passwords. Knowing how to enable this account is very helpful.
Here, we will use the command line interface to enable the account.
Launching Command Prompt
- Click on the “Start” button
- On the search bar, type “cmd”
- On the list, right click on “cmd” and select “Run as Administrator”
Note: We choose “Run as Administrator” so that we could accomplish the task with elevated administrative privileges. Without the elevated administrative privileges, you may not be able to accomplish the task.
Enabling the Administrator account
We will use the command line interface to enable the Administrator account. Now that we already have our command prompt windows up and running with administrative privileges, let us begin.
Step
| Action
| Remark
|
|---|---|---|
1
| Type "net users"
| Displays all the users in the local machine
|
2
| Type "net user administrator"
| Displays the current status of the Administrator account
|
3
| Type "net user administrator /active:yes"
| Enables the Administrator Account
|
4
| Type "net user administrator"
| Displays the current status of the Administrator account. Just to ensure that the account is now active
|
5
| Type "exit"
| Closes the Command Prompt Window
|


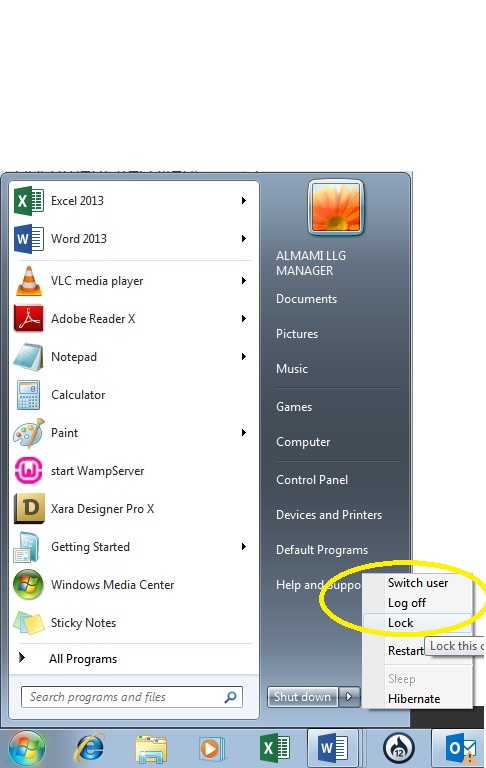
After you exit the command prompt window you can click on the “Start” button and select “Log Off”, “Switch User” or “Lock this Computer”. This will bring you to the Windows Log On screen where you can see that the Administrator account is now active. Click on the account and you can now log onto the computer using the Administrator account since it does not have a password associated with it.
Disabling the Administrator Account
It is however not at all necessary to enable the Administrator account because you can be able to perform most of the tasks that require administrative duties under ordinary circumstances using your normal administrative account.
For security reasons, it is advisable to disable the Administrator account. Disabling the Administrator account is just a matter of reversing the process of enabling the account.
We will use the command line interface to disable the Administrator account. Now that we already have our command prompt windows up and running with administrative privileges, let us begin.
Steps
| Action
| Remarks
|
|---|---|---|
1
| Type "net users"
| Displays all the users in the local machine
|
2
| Type "net user administrator"
| Displays the current status of the Administrator account
|
3
| Type "net user administrator /active:no"
| Disables the Administrator account
|
4
| Type "net user administrator"
| Displays the current status of the Administrator account. Just to ensure that the account is now deactivated
|
5
| Type "exit"
| This closes the command prompt window
|
Other Ways of Enabling/Disabling the Administrator account
You may also use the same commands to enable or disable the Administrator account under recovery options by using a bootable Windows DVD or USB flash drive.
After you exit the command prompt window you can click on the “Start” button and select “Log Off”, “Switch User” or “Lock this Computer”. This will bring you to the Windows Log On screen where you can see that the Administrator account is now deactivated. The Administrator account will not show on the Log On screen.
To learn how to create a bootable Windows Vista, Windows 7 or Windows 8 USB flash drive take a look at this article.
- How to create your own bootable USB flash drive for Windows Vista, Windows 7 or Windows 8
We will exploit the diskpart command in Windows to create a Bootable USB disk. Bootable USB disks or flash drives play a role of vital importance when it comes to installing Windows Vista, Windows 7 or Windows 8 on a computer. They also play importan
Related

How to Bypass Windows 7 Password and User Profile Failed the Logon Error

How to Safely Use Windows XP After Microsoft Ends Support

Using command prompt "attrib" to check for Viruses or Malware

What Happens If I Temporarily Disable My Cash App Card?

Parse Command Line Args for C# Winform & Console App


